
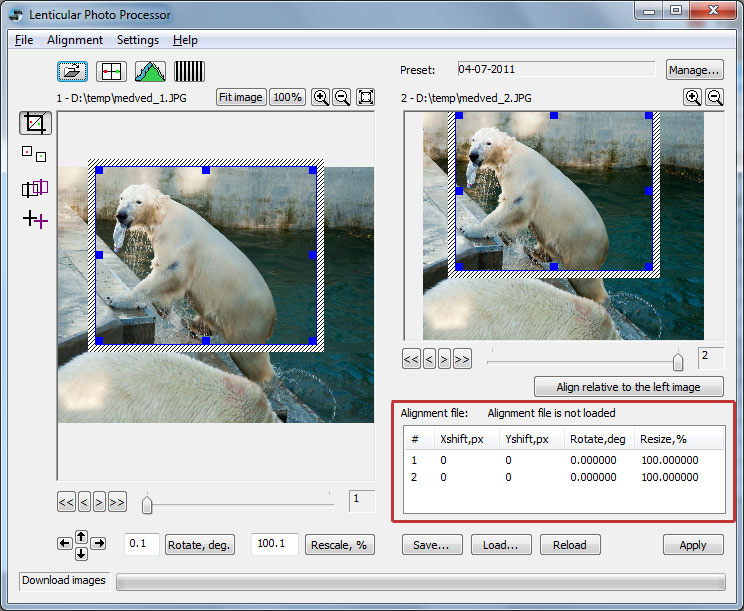
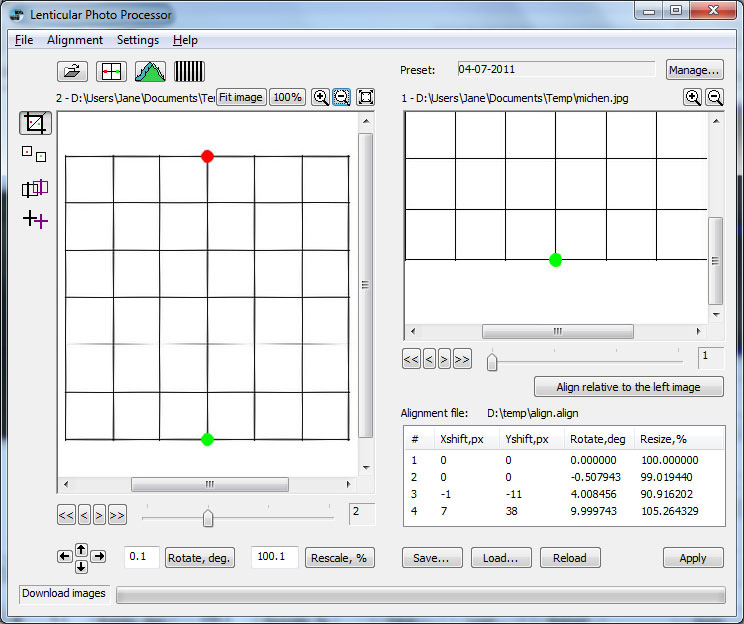
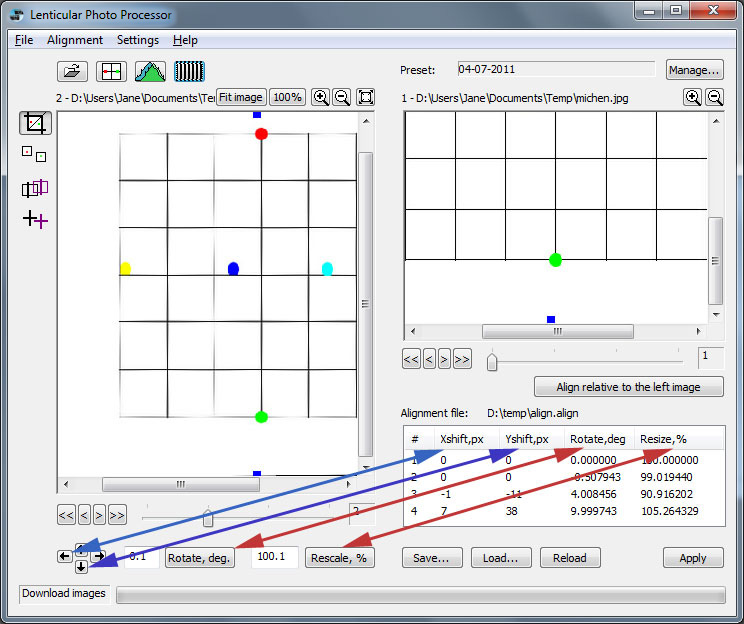
Picture 1. Main Window
Lenticular Photo Processor program is designed to take the frame sets obtained by the Lenticular Photo Capture program and prepare them for printing. Within this program you can load frame sets, control the alignment of the frames not only in the X and Y directions; but also rotational and focal length (zoom). This program also allows you to select the final crop and the final size of the finished image and interlace to the desired pitch. You can then print from this program (picture 1)..
Picture 1. Main Window
The Lenticular Photo Processor program accepts input formats BMP, PNG, TIFF, JPEG, output files are TIFF. The color mode of input and output files is RGB. The program supports TIFF files with LZW compression. TIFF files containing more than 4 layers are not supported.
The operating systems are Windows XP /Vista and Windows 7.
The resolution of the monitor should be 800 x 600 pixels or more. It is a good idea to use as large a monitor resolution as possible.
It is recommended that your computer should have at least 2Gb RAM. More is preferable.
One of the most tedious and time consuming parts of the
lenticular image process is the alignment of the multiple images in a
frame set. This is especially so when multiple cameras are used. The Lenticular Photo Processor program resolves this quickly and
easily. By capturing a set of images (one frame set) of our target the
program can automatically create an alignment file in about 30 seconds
by pressing the  button.
This alignment file will appear on the lower right hand side of your
screen and can be saved. This file is then used to correct all the
frame sets taken at this session as long as the camera set up is not
changed and the subjects are at the same location. As you retrieve the
frame sets from this session they will automatically be corrected by
this file as they are transferred from your hard drive to the Lenticular Photo Processor (Picture 2).
button.
This alignment file will appear on the lower right hand side of your
screen and can be saved. This file is then used to correct all the
frame sets taken at this session as long as the camera set up is not
changed and the subjects are at the same location. As you retrieve the
frame sets from this session they will automatically be corrected by
this file as they are transferred from your hard drive to the Lenticular Photo Processor (Picture 2).
Picture 2. Align file
The first step is to select the base reference frame; this will normally be one of the central frames. All the other frames will be scaled, aligned and shifted relative to this frame. So, each frame will be shifted by axis X and by axis Y, rotated and scaled. These corrections will all be saved in the special alignment file with align extension. These files can be kept, loaded into the program and used to correct and align a series of frames. All parameters of the alignment are shown in the table in the right bottom corner of your display screen. As long as the camera position and zoom of the camera lenses is not changed during the photo session, you can use the same alignment file for whole photo session whether or not this be hours, days or weeks.. You should keep an alignment file of each photo session on the hard drive of your computer. Use the Save, Load, Reload buttons for the preservation and loading of an alignment file.
Please Note; If the alignment file is preloaded, the frames will be automatically aligned as they are loaded into the program. The values of shifting, rotating and scaling, shown in the table, are used for aligning the frames during loading. Due to the fact that the loaded frames are already aligned, all you need to do next is to select your finished image size and crop. Though it is normally not necessary, at this point you can click the histogram matching button to correct the colors and brightness of the cropped areas of the frames. After that you simply have to interlace the frames and print the interlaced file.
If you have loaded or have reloaded a new alignment file you have to click button Apply, the frames loaded into the program will be aligned with new alignment values.
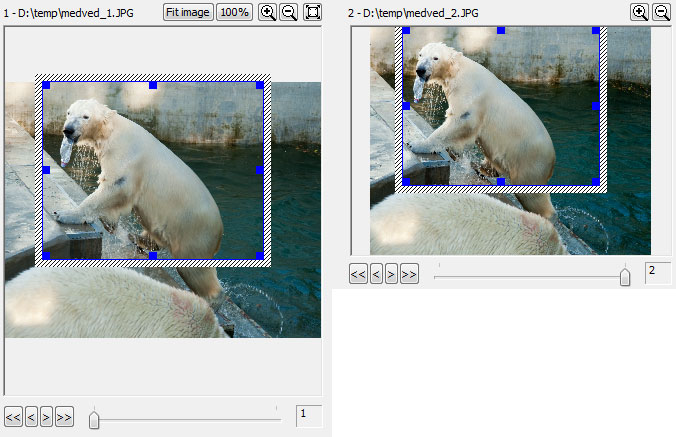
Picture 3. Viewing screen
The program has two viewing windows (Picture 3): The main
viewing window
is on the left. The secondary viewing window is to the right above the
correction file numerical display. Using the buttons  it is possible to look over the
different images in the frame set. Using the buttons
it is possible to look over the
different images in the frame set. Using the buttons  you can enlarge or reduce the
images. The image in the main left window can be enlarged or reduced by
turning the wheel of the mouse.
you can enlarge or reduce the
images. The image in the main left window can be enlarged or reduced by
turning the wheel of the mouse.
Lenticular Photo Processor has several different menus. There are File, Alignment, Settings and Help. Let examine them.
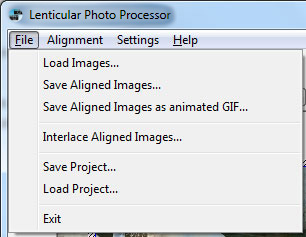
Picture 4. File Menu
 (Picture 5).
Picture 5. Load Images
A frame set is loaded by pressing the Select... button. Before adding a new frame set the previous frame set needs to be removed by pressing the Clear list button.
You can delete any file from the list by firstly clicking on the desired file and then pressing the Delete button. To change the order of the frames click on the desired frame and then use the Move up and Move down buttons to place it in the desired order.
Open foler button opens the Open Folder dialogue for the Eye-fi cards.
Choose main folder name and subfolder's basename. Subfolder's name is subfolder's basename + serial number.
If Leading zeroes for camera position = 0, subfolder's name will be, for example, Frame1.
If Leading zeroes for camera position = 1, subfolder's name will be, for example, Frame01.
If Leading zeroes for camera position = 2, subfolder's name will be, for example, Frame001.
ets.
If you have 6 cameras, first camera position = 1, last camera position = 6. If you have only one camera first camera position = 1, last camera position = 1.
Turn on Exclude and don't open the files of previous session, load only a new files, and the programs loads only a new shot photos.
F9 is hot key to load the eye-fi photos.
Picture 6. Alignment Menu
Picture 7. Alignment table
All of these commands can be done by using the buttons Save, Load, Reload, Apply.
This is accomplished by capturing a frame set of our target board (Picture 8). Place the target board horizontally at the mid point of where your object will be placed. It is a good idea to mark this location on the floor with masking tape so that you can place each object at the same position.
Picture 8. Target
The cameras are set up on the target, which is then photographed using the same number of frames that you have chosen for your objects. The target images are automatically stored on your hard drive by the Lenticular Photo Capture program. Load this frame set to the Lenticular Photo Processor program and by using the command Auto Alignment from the alignment menu the correction file will be created and displayed on the computer screen below the secondary window. This alignment file should be saved to the hard drive, it is a good idea to use the date and time created as the file number.
All the frame sets taken with this set up will now be corrected by this file as they are selected from the hard drive and loaded into the Lenticular Photo Processor software.
!!! PLEASE NOTE: The complete alignment target must appear in all the frames of the set for auto alignment to occur. The software requires that there is no other red or green item other than the crosses in the cropped area for the auto alignment. You must have the white balance correct on the cameras to enable the software to find the correct color of cross to be detected automatically. Reflected glare from lights on the target must also be avoided
When aligning the images it is best to select a central image from the set in the main (left) viewing window. This becomes your reference image. This will be the image to which all the other images in the set are aligned.
!!! The auto alignment works very reliably if the requirements above are met. Repeated attempts are not needed if you have followed the right set up procedure
Picture 9. Target
, select
the frame that has better color and press Histogram
Matching or press the  .
.
Picture 10. Settings Menu
Picture 11. Preview Settings
Picture 12. Crop Settings
For example, if we have to make the picture with size of 8"x10" (20x25 cm), enter the width and height 8 by 10 and the cropping lines will move, keeping the same proportions.
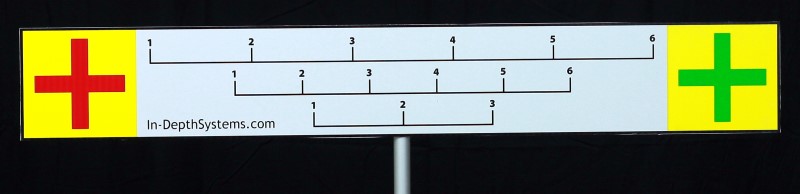
Picture 13. Measuring System
Picture 14. Automate Settings
 -
These icons are the main tools of Lenticular Photo Processor program:
-
These icons are the main tools of Lenticular Photo Processor program:
-
this is the same command as File -> Load Images. - this is
the same command as Alignment -> Auto Alignment.
- this is the same command as Alignment -> Histogram
Matching. To undo Histogram Matching, it is necessary to
press Alignment -> Undo Histogram Matching. button opens the following dialog for interlacing the frames (Picture
15):
button opens the following dialog for interlacing the frames (Picture
15): 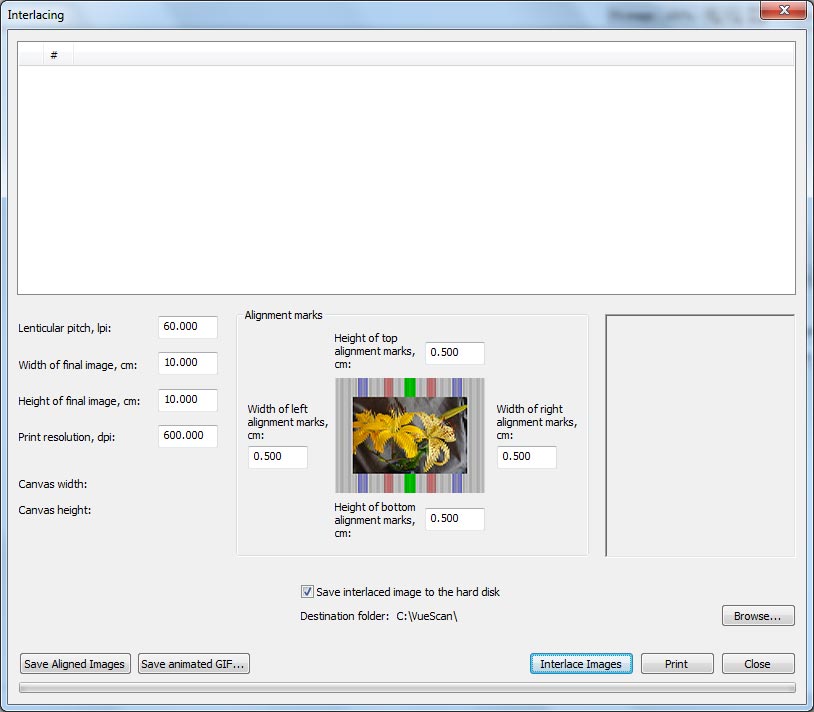
Picture 15. Interlacing Dialogue
At the top window of Interlacing dialog you can see the names of each frame that you are using for interlacing. At the left you can see the checkboxes. All checked frames will participate in an interlacing process, all unchecked will not.
It is always good idea to use as many frames as possible because the quality of resulting image will be higher, but sometimes we do not have to use all of the frames for getting a good result. For example this feature is usefull it could be useful in situations such as the following;
Lenticular pitch, lpi - enter the pitch of the lenticular sheet from the pitch test.
Width of final image - width of the final image.
Height of final image - height of the final image.
Print resolution, dpi - the printer's resolution.
Alignment marks - the height and the width of the alignment marks around the interlaced picture.
Canvas width: - shows the real width of an interlaced image with widths of alignment marks in pixels and in inches or centimeters.
Canvas height: - shows the real height of an interlaced image with heights of alignment marks in pixels and in inches or centimeters.
Save interlaced image to the hard disk - interlaced image will be saved to the Destination folder (please, choose the destination folder before the interlacing). Interlaced file name will be first frame name-last frame name-preset name.tif
Save Aligned Images - saves aligned and cropped images. This is the same command as File -> Save Aligned Images...
Save animated GIF... - creates animated GIF file (Picture 16). This is the same command as File -> Save Aligned Images as animated GIF.... In Animated GIF creation dialog you can select the size of animated file, speed of changing the frames and some other parameters.

Picture 16. Animated GIF creation
Interlace Images - starts process of interlacing, Print - causes dialog for printing (Picture 17):
Picture 17. Print dialog
Setup printer... button allows to change settings of the printer, Image position sets position of the interlaced picture on the sheet. Print starts printing.
!!! Set the best quality settings in your printer driver as default settings. Run Devices and Printers, select the printer, choose from the contest menu (right button mouse click) Printing preferences, set the best quality printing settings and click the button Apply. Your settings will be default.
Of course, select Set as default printer from the contest menu (right button mouse click for the printer icon).
On occasion you may wish to adjust the alignment of your frames to suit a specific type of image. This can be achieved by adjusting the individual values of the parameters generated in the alignment file for that image.
There are buttons for manual alignment under the main (left) viewing window (Picture 18):
Picture 18. Manual Alighnment
 - Buttons for
shifting of a frame upwards, downwards, to the left and to the right.
All of these commands are done by using the arrow keys on the keyboard.
- Buttons for
shifting of a frame upwards, downwards, to the left and to the right.
All of these commands are done by using the arrow keys on the keyboard.
 - to rotate.
To the left of the button there is an input box for the rotation angle,
this angle increases the already made
rotation angle. When we press the Rotate
button, the picture is rotated. The amount of rotation to be applied is
entered in the box and when the button is depressed, this is the amount
that the image will be rotated in a clockwise direction. If you enter a
minus (-) value in this box, that is the amount that the image will be
rotated in a counter-clockwise direction.. Also you can use "*"
button on keyboard to rotate the frame on "0.1 degree
clockwise" and "/" button
on keyboard to rotate the frame on "0.1 degree
counter-clockwise".
- to rotate.
To the left of the button there is an input box for the rotation angle,
this angle increases the already made
rotation angle. When we press the Rotate
button, the picture is rotated. The amount of rotation to be applied is
entered in the box and when the button is depressed, this is the amount
that the image will be rotated in a clockwise direction. If you enter a
minus (-) value in this box, that is the amount that the image will be
rotated in a counter-clockwise direction.. Also you can use "*"
button on keyboard to rotate the frame on "0.1 degree
clockwise" and "/" button
on keyboard to rotate the frame on "0.1 degree
counter-clockwise". - scaling. To
the left of the button there is an input box for value of scaling in
percentage. This value is multiplied by
the previously done scaling. When we press the Rescale
button, the picture is scaled. Pay attention that if the value is less
than 100% the frame will be diminished, if the value is bigger than
100% the frame will be enlarged. Also you can use "+"
button on keyboard to enlarge the frame to 100.1%
and "-" button on keyboard to diminish
the frame to 99.9%.
- scaling. To
the left of the button there is an input box for value of scaling in
percentage. This value is multiplied by
the previously done scaling. When we press the Rescale
button, the picture is scaled. Pay attention that if the value is less
than 100% the frame will be diminished, if the value is bigger than
100% the frame will be enlarged. Also you can use "+"
button on keyboard to enlarge the frame to 100.1%
and "-" button on keyboard to diminish
the frame to 99.9%.!!! Pay attention, that the keys "-" and "Subtract", and "+" and "Add" are different on keyboard and do not mix them up during your work. Please, see the picture 19.

Picture 19
All these changes are shown in the table of the alignment parameters. Select the reference frame in the main (left) window. The reference frame will remain unchanged and we are going to align all other frames to it. In this example the reference frame is #6 and we are going to align frame #1 to it (Picture 20).
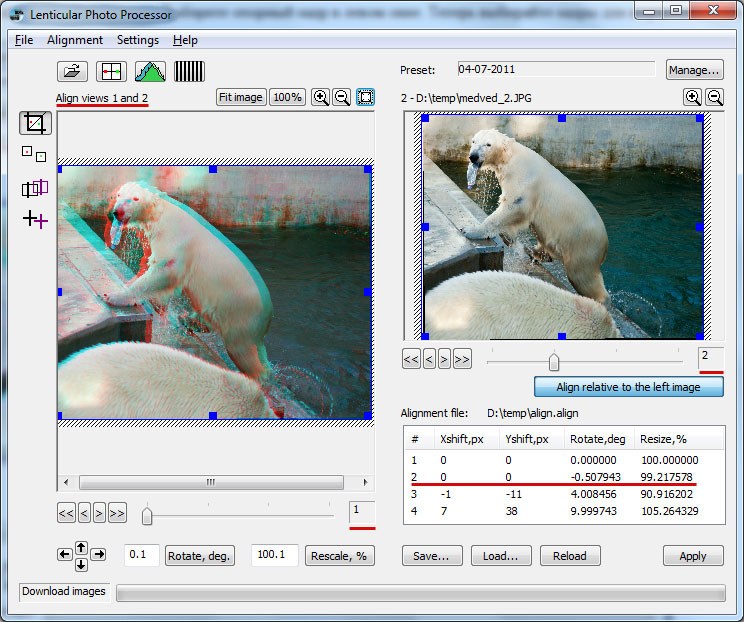
Picture 20. Frames Alignment
When we click the button Align relative to the left image, an anaglyph (Red-Cyan) image will appear in the left window for alignment of the right frame image (frame #1) relative to the reference image. An anaglyph picture of the combined images is a user friendly way to show the two frames simultaneously. In our example we see an inscription Align views 1 and 2. This means that the alignment buttons will be effective for aligning the right frame (#2) relative to the left frame (#1). All of these changes will be shown in the table of the alignment parameters.
When you have completed working with this frame just click the Align relative to the left image button again and this will return your display to normal. You can then select another frame on the secondary (right) viewing screen and repeat the previous steps.
These 4 icons allow you to do the following starting from the top: Crop, Isolate the color marks, Shift a stereo window and Shift a zero point.
 - Frame
cropping (Picture 21):
- Frame
cropping (Picture 21):
Picture 21. Cropping Frames
Here we see the crop lines for cropping the image. To crop the images proportionally, press the command Settings -> Crop Settings. You will see a dialog for setting the proportions (Picture 22).
Picture 22. Cropping Proportion
For example, if we wish to produce an image with the size of 8 by 10 inches, we can put the values of width and height as 8 by 10 and the cropping lines can be moved, keeping the same proportions.
This feature could be extremely useful for making an alignment file automatically if your alignment shot contains Red and/or Green colors other than those on the target board. For example if you take a picture using a Green background. All Red and Green objects in a photo scene, except the color marks on a target board, will confuse the program and you will not get a succesful alignment automatically. The Lenticular Photo Processor program analyzes the colors inside the cropped frame area only, so if you use a Green background for example, you can photograph the target while holding a sheet or blanket of any colour other than red or green behind the target. By cropping the area to only inclyde the target against the blanket colour a good alignment file can automatically be made. Just make sure that you uncheck the crop proportionally button to get the most effective crop.

Picture 23
 - Isolating the color marks
(Picture 24):
- Isolating the color marks
(Picture 24):
Unfortunately sometimes we can not isolate the target from background using the blanket, for example it could be if we want to shoot a big object like motorcycle on the Green grass. In this case this feature gives us an opportunity to isolate each color mark separately by using the Alignment Squares. All you need is to move and to zoom the Alignment Squares for isolating the Red and Green color marks from background on each frame.

Picture 24
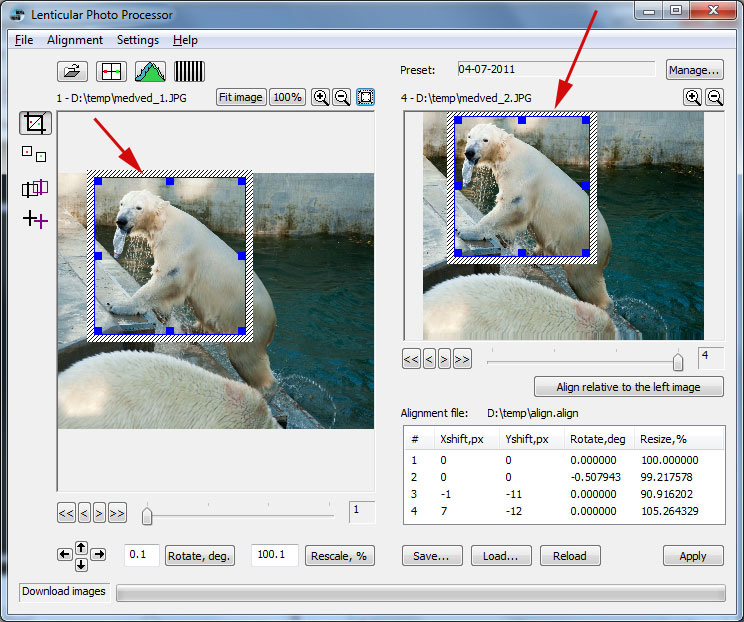
 - Shifting of a
stereo window for all frames at once:
- Shifting of a
stereo window for all frames at once:
If you click this button you will see a vertical line. This line will help you to shift the position of a stereo window (or a point with a zero parallax - "zero point") on all frames at once. To begin select the first frame in the main (left) window, put the vertical line in a position where a "zero point" should be, for example, on an eye of human. Then select the last frame in the secondary window and put the vertical line on the same position of eye. All frames will move proportionally on axis X, and the stereo window of all the frames will be moved. Thus all alignment parameters on the X axis in the table will be changed. If you do not like the result, press button Reload and reload an alignment file. If the result is good, save the alignment file on the hard drive of your computer.
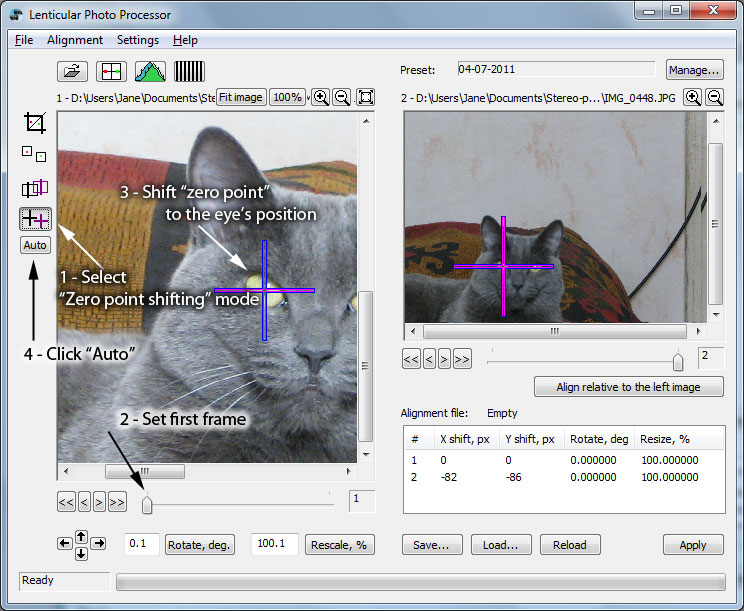
 - Shifting of a
"zero point" for each separate frame:
- Shifting of a
"zero point" for each separate frame:
In this mode you will see the cross for moving the "zero point" of each frame. The first step is to select the first frame in the reference window, put a cross in a position where you want the "zero point" to be, for example, on an eye of human. Then select a second frame on the secondary screen and put a cross on the same position of eye, the second frame will be aligned relative to the first frame and will be aligned relative to axis X and axis Y. Thus all alignment parameters on axis X and axis Y in the table will be changed for that image. Do the same with each frame. After that you can save the alignment file on the hard drive of your computer. You can move the cross using the mouse or arrow buttons on keyboard.
Unlike conventional photography which is easy to resize the images, lenticular images need to have their data reformulated for each different size, lens format used and pitch used or even to suit different viewing distances on images using the same lenticular lens. Our software can save a lot of time as it contains the ability to have a large number of preset options for formulating the image output.
Before interlacing you have to enter into the Lenticular Photo Processor program all information about the lenticular lens you are going to use and the size of your final picture because the program needs this information for generating an interlaced file. We can do that in the Interlacing window (Picture 25).
Picture 25. Interlacing
If you want to make some certain size lenticular pictures using certain lenticular lenses again and again, it is better to create a special preset and use it always when you need it. It will save a lots of your time and effort.
For creating a preset you should:
 . Now you will see
the Manage Presets
window.
. Now you will see
the Manage Presets
window.
Picture 26. Manage Presets
 button.
For loading a certain preset you should select one of
available presets from the table and click  button in a Manage Presets
window.
button in a Manage Presets
window.
TO deletE a certain preset you should select the preset from
the table and click  button in a Manage Presets
window.
button in a Manage Presets
window.
The program works with RGB color model and does not work with multilayered TIFF-files.
If you encounter problems with the software contact wmiller@inbox.ru.
Copyright © 2011 All the rights to program Lenticular Photo Processor belong to Evgeniya Vazenmiller.