Beginners
PhotoProjector creates interlaced images for lenticular sheets and barrier-screens. The process
of creating Lenticular Images is one of precision and when you first start out, you may fail to produce the desired
results. Do not give up. Many people expect to purchase Lenticular software and immediately, like magic, produce
a flip or 3D image. This is unlikely as you will need to carefully read through the help files to establish a set
of parameters for any image you are going to create.
Why?
To create a Lenticular Image to be viewed with a Lenticular Screen, PhotoProjector is going to take a set of images
you have created and splice them together in such a way they precisely fit the method your specific printer uses
to produce prints and the exact way your Lenticular Screen is made. The process is very exacting and made more
difficult because each printer lays down ink on the paper in a slighly different way, and many types of lenses
exist with differing working parameters. Our final Interlaced image must have strips of image data arranged to
match exactly where your printer is able to print them and the image strips must also precisely align with the
strips of lenses in the Lenticular Sheet.
DPI
Inkjet Printers (the type you use at home) print at 1200x600dpi, 2400x1200dpi, 4800x2400dpi or 1440x72dpi0, 2880x1440dpi
etc,.
Epson Printers use multiples of 720dpi and Lexmark, Canon, HP, use multiples of 300.
Those Dots Per Inch (dpi) are important.
It is critical from the outset to determine your printer's DPI value, the DPI of the images you are going to use
for the flip or 3D and also their height and width dimensions. If you are making your first Lenticular Image, perhaps
it is best to prepare your images for your first attempt so they are 6x4 inches at 600 dpi or 300dpi for non-epson
printers, and 6x4 inches at 720dpi or 360dpi for epson printers. This will ensure your start images are in dpi
multiples appropriate to your printer.
LPI
Every Lenticular Sheet is precisely made and has a set of Parameters (values) to describe the way the lenses in
the sheet are made.
One of these values is LPI or Lenses Per Inch. Screens may come as 20LPI, 50LPI, 60LPI,
75LPI, 100LPI and other frequencies too.
Although the lenses are made precisely and quote how many lenses per inch they contain, you will need to do a test
of the screen using your printer to determine a more prcise LPI to use in PhotoProjector for each of your projects.
You will use the Software called PitchTest.exe (contained in the same directory as PhotoProjector) to print a test
image on your printer. This test will determine the way your printer's dpi capability will marry up with the real
frequency of the lens in the sheet.
You should consult the details in the main help files (after closing this window) to learn how to do the PitchTest
and enter the true LPI into PhotoProjector's database.
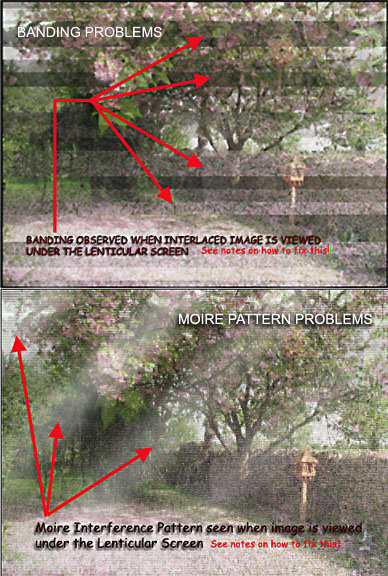
Banding in final Image (Moire Interference or Block Banding)
Even with all parameters set correctly, and your final interlaced image printed and working as a flip or 3D, it
may be spoilt by banding where strong linear blocks of image data spoil the effect or by moire - where inteference
of various frequencies (printer dpi, size of image, resolution of image, LPI of Lenticular Screen create an undesirable
harmonic).
See examples below:
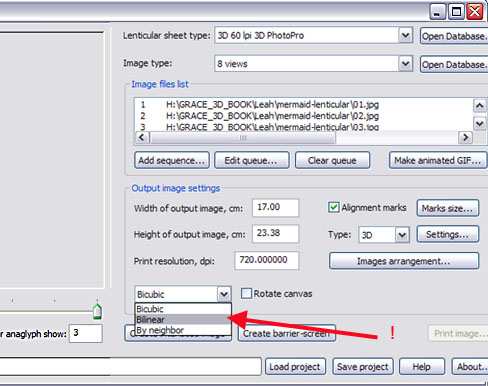
To eliminate Banding Issues (not Moire), ensure you do not select 'interpolation by neighbour'
either in PhotoProjector when creating the interlaced image or in Photoshop when possibly enlarging your original
images. Select Bilinear Interpolation!
To elimate Moire in final images
This may happen due to a mix of LPI, Print DPI, Printer resolution DPI or any number of cross-harmonics of frequency
events between printing, printer, screen, image size. If this happens, you can produce the Interlace as a partly
rotated image and print it this way (without restoring it to vertical orientation in Photoshop). Please read
carefully this help file!
Viewing your final Image
With very thin Lenticular Sheets you must align the screen delicately with your image and press the screen
down flat so that every part of the screen underside is in contact with the image. Complete quality viewing is
only achieved when the screen and image are glued together!
|